I found this on pinterest and I just had to share it with you guys. I think it is a great way to collaborate nail polish and jewelry. Not to mention it is stylish. This was originally posted by Cassandra from The Reluctant Femme she has so many different things on her blog, so why not check her out.
Step One: Get Your Gear
I’ve been mostly shopping at The Great Big Bead Shop and Jasmin Studio Crafts, but if you punch “cabochon” into Ebay or Etsy you’ll get plenty of options. For this project you’ll need to gather the following;
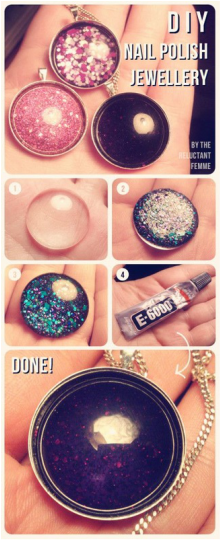
- A clear glass cabochon
A cabochon is what jewellers call any gem that is flat on one side and domed on the other. They can be made of just about anything – opal, moonstone, petrified wood – but you want a clear glass or resin one for this project so the polish will show through.
- A cabochon tray
This is also sometimes called a cabochon setting. It’s basically the metal part that holds your cabochon, and lets you attach a chain or whatever. Be careful to get a tray that fits whatever size and shape of cabochon you’ve chosen. Often sellers will carry both in their stores, which makes it easy to be sure it will fit, but if you end up going to one place for the cabochon and another for the tray, be extra careful to make sure the measurements match.
- Glue
I’ve been using a glue called E6000, because that’s what a couple of people recommended to me. It’s reasonably inexpensive, and you only need a teeny bit to make a nice hard bond.
I imagine there are a lot of different glues you could use, but if you’re going to use something different make sure to test it first. Glue is full of all sorts of exciting chemicals that can react in unpredictable ways when pressed against something else full of chemicals (like nail polish), so you want to be sure what you’re using to hold it together won’t end up
making it a mess.
- Nail Polish
I’m going to go ahead and assume you’ve got this part covered. I personally have a real fondness for using polishes with really subtle glitter in them, or a duochrome, because the curve of the cabochon really makes every little reflection pop, but anything you like will work.
Step Two: Put It Together
First, you want to get your cabochon and rest it flat side up in the palm of your hand. This prevents the roundness of the dome from making it rock all over the place. Then paint the flat side with a nice solid layer of polish. I prefer to put down a relatively thick layer if I’m using a glitter, just so it stays wet enough that I can push the glitters around wherever I want them. Make sure you get the polish all the way to the edge of the flat side so you don’t get bald patches, but try not to get too much down the sides because this can affect how well it sits in the tray. You also want to try and make it as even as you can, because if it dries lumpy it will sit wonky in the tray. Once you’re happy with the paint job, put it down carefully and go find something else to do, because you want to give it about an hour between coats to dry super thoroughly.
What polish you’re using will determine how many coats you do. If you’re using something like a jelly with lots of glitter in it, three layers looks AMAZING because it ends up looking like a gemstone full of glitters. You’re also best off then doing a layer of a solid, matching colour so the back of the tray doesn’t reflect through the polish. If the polish you’re using is more opaque, two coats on its own should be plenty. You can check how it will look in the finished piece by picking it up carefully and taking a look through the rounded side.
Once you’re happy with it, leave it to dry overnight.
The next day (or in my case, when you remember you were in the middle of that thing and you should really finish it), pop a small blob of glue in the middle of the cabochon tray and swirl it around a bit. Pop the cabochon in gently (flat side down), and push down slightly so the glue spreads a little. Once again, leave it to dry overnight.
And with that, you’re done! Add a chain or a length of cord, and you’ve made something quite probably totally unique. From here you can branch out into earrings, or rings, all sorts of things. The possibilities are enormous, and exciting!
Thanks Cassandra!!
I’ve been mostly shopping at The Great Big Bead Shop and Jasmin Studio Crafts, but if you punch “cabochon” into Ebay or Etsy you’ll get plenty of options. For this project you’ll need to gather the following;
- A clear glass cabochon
A cabochon is what jewellers call any gem that is flat on one side and domed on the other. They can be made of just about anything – opal, moonstone, petrified wood – but you want a clear glass or resin one for this project so the polish will show through.
- A cabochon tray
This is also sometimes called a cabochon setting. It’s basically the metal part that holds your cabochon, and lets you attach a chain or whatever. Be careful to get a tray that fits whatever size and shape of cabochon you’ve chosen. Often sellers will carry both in their stores, which makes it easy to be sure it will fit, but if you end up going to one place for the cabochon and another for the tray, be extra careful to make sure the measurements match.
- Glue
I’ve been using a glue called E6000, because that’s what a couple of people recommended to me. It’s reasonably inexpensive, and you only need a teeny bit to make a nice hard bond.
I imagine there are a lot of different glues you could use, but if you’re going to use something different make sure to test it first. Glue is full of all sorts of exciting chemicals that can react in unpredictable ways when pressed against something else full of chemicals (like nail polish), so you want to be sure what you’re using to hold it together won’t end up
making it a mess.
- Nail Polish
I’m going to go ahead and assume you’ve got this part covered. I personally have a real fondness for using polishes with really subtle glitter in them, or a duochrome, because the curve of the cabochon really makes every little reflection pop, but anything you like will work.
Step Two: Put It Together
First, you want to get your cabochon and rest it flat side up in the palm of your hand. This prevents the roundness of the dome from making it rock all over the place. Then paint the flat side with a nice solid layer of polish. I prefer to put down a relatively thick layer if I’m using a glitter, just so it stays wet enough that I can push the glitters around wherever I want them. Make sure you get the polish all the way to the edge of the flat side so you don’t get bald patches, but try not to get too much down the sides because this can affect how well it sits in the tray. You also want to try and make it as even as you can, because if it dries lumpy it will sit wonky in the tray. Once you’re happy with the paint job, put it down carefully and go find something else to do, because you want to give it about an hour between coats to dry super thoroughly.
What polish you’re using will determine how many coats you do. If you’re using something like a jelly with lots of glitter in it, three layers looks AMAZING because it ends up looking like a gemstone full of glitters. You’re also best off then doing a layer of a solid, matching colour so the back of the tray doesn’t reflect through the polish. If the polish you’re using is more opaque, two coats on its own should be plenty. You can check how it will look in the finished piece by picking it up carefully and taking a look through the rounded side.
Once you’re happy with it, leave it to dry overnight.
The next day (or in my case, when you remember you were in the middle of that thing and you should really finish it), pop a small blob of glue in the middle of the cabochon tray and swirl it around a bit. Pop the cabochon in gently (flat side down), and push down slightly so the glue spreads a little. Once again, leave it to dry overnight.
And with that, you’re done! Add a chain or a length of cord, and you’ve made something quite probably totally unique. From here you can branch out into earrings, or rings, all sorts of things. The possibilities are enormous, and exciting!
Thanks Cassandra!!
